This section introduces several practical examples to enhance readers' understanding of Excel VBA and Python xlwings.
Application Example 1: Batch Creating and Deleting Worksheets
One benefit of Excel script development is that it allows computers to automatically handle batch tasks, greatly improving work efficiency and avoiding errors. This section uses Excel VBA and Python xlwings to batch create and delete worksheets.
1. Batch Creating Worksheets
Below, we use a for loop and the Add method of the Worksheets object to batch create worksheets.
【Excel VBA】
The path of the sample file is Samples\ch013\Excel VBA\Application Example 1\Batch Create and Delete Worksheets.xlsm.
Sub ShtAdd10()
    Dim intI As Integer
    For intI = 1 To 10  'Batch create 10 worksheets
        'New worksheets are placed at the end of all worksheets
        Sheets.Add After:=Sheets(Sheets.Count)
    Next
End Sub
After running the procedure, the 10 newly created worksheets are shown in Figure 1-26.
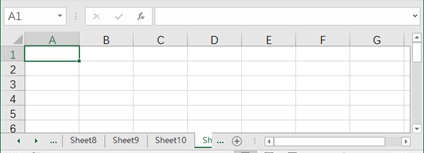
Figure 1-26 10 Newly Created Worksheets
【Python xlwings】
The path of the sample .py file is Samples\ch13\Python\Example 1-1, and the file name is sam1-101.py.
import xlwings as xw  	#Import the xlwings package, alias as xw
app = xw.App()  			#Create an Excel application
bk = app.books(1)  		#Get the workbook object
for i in range(1, 11):  	#Batch create 10 worksheets
    #New worksheets are placed at the end of all worksheets
    bk.api.Worksheets.Add(After=bk.api.Worksheets(bk.api.Worksheets.Count))
In the Python IDLE script window, select Run → Run Module, and the 10 newly created worksheets are shown in Figure 1-26.
2. Batch Deleting Worksheets
【Excel VBA】
The path of the sample file is Samples\ch013\Excel VBA\Application Example 1\Batch Create and Delete Worksheets.xlsm. Note that when deleting worksheets, you must delete from back to front so that the index numbers of the remaining worksheets do not change.
Sub ShtDelete10()
    Dim intI As Integer
    Application.DisplayAlerts = False
    For intI = 11 To 2 Step -1  'Batch delete 10 worksheets
        Sheets(intI).Delete
    Next
    Application.DisplayAlerts = True
End Sub
After running the procedure, 10 worksheets are deleted in batches.
【Python】
This example uses a for loop and the Delete method of the Sheets object to batch delete specified worksheets in a workbook. The path of the workbook file is Samples\ch13\Python\Example 1-2\test01.xlsx, which contains 11 worksheets numbered 1 to 11 in order. The path of the sample .py file is Samples\ch13\Python\Example 1-2, and the file name is sam1-102.py. Note that when deleting worksheets, we delete from back to front.
import xlwings as xw  		#Import the xlwings package
import os  					#Import the os package
root = os.getcwd()  			#Get the current directory of the .py file
#Create an Excel application, visible, without adding a workbook
app = xw.App(visible=True, add_book=False)
#Open the test01.xlsx file in the current directory, writable, return the workbook object
bk = app.books.open(fullname=root + r'\test01.xlsx', read_only=False)
app.display_alerts = False  	#Do not pop up the prompt dialog when deleting worksheets later
for i in range(11, 1, -1):  	#Batch delete 10 worksheets
    bk.api.Sheets(i).Delete()
app.display_alerts = True
In the Python IDLE script window, select Run → Run Module to batch delete 10 worksheets from back to front.
Application Example 2: Classifying and Splitting Worksheets by a Column
The staff information of various departments is shown in the "Before Processing" worksheet in Figure 1-27. Now, we split the worksheet data according to the values in column A, grouping the staff information of each department into a new table named after the department. The splitting idea is to traverse each row of the worksheet; if a worksheet named after the department does not exist, create a new worksheet with that name; if it already exists, append the row information to the existing worksheet.
Figure 1-27 Splitting Worksheets into Multiple New Worksheets by Department
We use Excel VBA and Python xlwings to split the worksheets.
【Excel VBA】
The path of the sample file is Samples\ch013\Excel VBA\Application Example 2\Staff of Various Departments.xlsm.
Sub CF()
    'Classify by column A of the worksheet and split into multiple worksheets
    Dim lngI As Long, lngJ As Long
    Dim strT As String, strS As String
    Dim lngN As Long, lngR As Long
    Application.ScreenUpdating = False  	'Cancel window redrawing
    Application.DisplayAlerts = False  	'Cancel warning prompt dialogs
    'Traverse each row of the data table
    For lngI = 2 To Range("A" & Rows.Count).End(xlUp).Row
        Worksheets("Summary").Select
        strT = Range("A" & lngI).Text  		'Get the name of the department to which the row belongs
        strT = Range("A" & lngI).Text  		'Get the name of the department to which the row belongs
        If InStr(strS, strT) = 0 Then
            'If it is a new department, add the name to strS and copy the header and data
            strS = strS & strT & " "
            Worksheets.Add After:=Worksheets(Worksheets.Count)
            ActiveSheet.Name = strT
            Worksheets("Summary").Rows(1).Copy ActiveSheet.Rows(1)
            Worksheets("Summary").Rows(lngI).Copy ActiveSheet.Rows(2)
        Else
            'If the department name already exists, directly append the data row
            Worksheets(strT).Select
            lngR = ActiveSheet.Range("A" & ActiveSheet.Rows.Count).End(xlUp).Row + 1
            Worksheets("Summary").Rows(lngI).Copy ActiveSheet.Rows(lngR)
        End If
    Next
    'Delete the first column of the newly generated worksheets
    For intI = 2 To Worksheets.Count
        Worksheets(intI).Columns(1).Delete
    Next
    Application.ScreenUpdating = True
    Application.DisplayAlerts = True
End Sub
After running the procedure, the worksheet is split, and the effect is shown in the "After Processing" worksheet in Figure 1-27.
【Python xlwings】
The code for splitting using Python xlwings is as follows. The path of the sample data file is Samples\ch13\Python\Application Example 2\Staff of Various Departments.xlsx, and the .py file is saved in the same directory with the name sam1-103.py.
import xlwings as xw  	#Import the xlwings package
#Import Direction from the constants class
from xlwings.constants import Direction
import os  				#Import the os package
root = os.getcwd()  		#Get the current working directory, i.e., the directory where the .py file is located
#Create an Excel application, visible, without adding a workbook
app = xw.App(visible=True, add_book=False)
#Open the "Staff of Various Departments.xlsx" file in the current directory, writable, return the workbook object
bk = app.books.open(fullname=root + r'\Staff of Various Departments.xlsx', read_only=False)
app.screen_updating = False  	#Cancel window redrawing
app.display_alerts = False  	#Cancel warning prompt dialogs
sht = bk.sheets(1)  			#Get the "Summary" worksheet
#Get the number of rows in the data region of the worksheet
irow = sht.api.Range('A' + str(sht.api.Rows.Count)).End(Direction.xlUp).Row
strs = []  					#Create an empty list strs
for i in range(2, irow + 1):   	#Traverse each row of the data table
    sht2 = bk.api.Worksheets('Summary')  		#Get the "Summary" worksheet
    strt = sht2.Range('A' + str(i)).Text  	#Get the name of the department to which the row belongs
    if(strt not in strs):
        #If it is a new department, add the name to the strs list and copy the header and data
        strs.append(strt)
        bk.api.Worksheets.Add(After=bk.api.Worksheets(bk.api.Worksheets.Count))
        bk.api.ActiveSheet.Name = strt
        bk.api.Worksheets('Summary').Rows(1).Copy(bk.api.ActiveSheet.Rows(1))
        bk.api.Worksheets('Summary').Rows(i).Copy(bk.api.ActiveSheet.Rows(2))
    else:
        #If the department name already exists, directly append the data row
        bk.api.Worksheets(strt).Select()
        r = bk.api.ActiveSheet.Range('A' + \
              str(bk.api.ActiveSheet.Rows.Count)).\
              End(Direction.xlUp).Row + 1
        bk.api.Worksheets('Summary').Rows(i).\
              Copy(bk.api.ActiveSheet.Rows(r))
#Delete the first column of the newly generated worksheets
for i in range(1, bk.api.Worksheets.Count + 1):
    bk.api.Worksheets(i).Columns(1).Delete()
    bk.api.Worksheets(i).Columns(1).Delete()
app.screen_updating = True
app.display_alerts = True
In the Python IDLE script window, select Run → Run Module to split the worksheet. The splitting effect is shown in the "After Processing" worksheet in Figure 1-27.
Application Example 3: Saving Multiple Worksheets as Workbooks Separately
The staff information of various departments is shown in the "Before Processing" worksheet in Figure 1-28. The staff information of different departments is placed in separate worksheets. Now, we require saving the data in different worksheets as separate workbook files.
Figure 1-28 Saving Multiple Worksheets as Workbook Files Separately
We use Excel VBA and Python xlwings to save each worksheet's data as a separate workbook file.
【Excel VBA】
The path of the sample file is Samples\ch013\Excel VBA\Application Example 3\Staff of Various Departments.xlsm.
Sub SaveToFile()
    Application.ScreenUpdating = False  	'Cancel window redrawing
    Dim strFolder As String
    strFolder = ThisWorkbook.Path  		'Get the current directory
    Dim shtT As Worksheet
    For Each shtT In Worksheets  		'Traverse each worksheet and save separately
        'Create a new workbook and copy the data from the original worksheet
        'The newly created workbook is the active workbook
        shtT.Copy
        'Save to a file, with the file name being the name of the original worksheet
        ActiveWorkbook.SaveAs strFolder & "\" & shtT.Name & ".xlsx", 51
        ActiveWorkbook.Close
    Next
    Application.ScreenUpdating = True
End Sub
After running the procedure, the data in each worksheet is saved. The processing effect is shown in the "After Processing" worksheet in Figure 1-28.
【Python xlwings】
The code implemented using Python xlwings is as follows. The path of the sample data file is Samples\ch13\Python\Application Example 3\Staff of Various Departments.xlsx, and the .py file is saved in the same directory with the name sam1-104.py.
import xlwings as xw  	#Import the xlwings package
import os  				#Import the os package
root = os.getcwd()  		#Get the directory where the .py file is located, i.e., the current directory
#Create an Excel application, visible, without adding a workbook
app = xw.App(visible=True, add_book=False)
#Open the "Staff of Various Departments.xlsx" file in the current directory, writable, return the workbook object
bk = app.books.open(fullname=root + r'\Staff of Various Departments.xlsx', read_only=False)
app.screen_updating = False  		#Cancel window redrawing
for sht in bk.api.Worksheets:  	#Traverse each worksheet and save separately
    #Create a new workbook and copy the data from the original worksheet
    #The newly created workbook is the active workbook
    sht.Copy()
    #Save to a file, with the file name being the name of the original worksheet
    app.api.ActiveWorkbook.SaveAs(root + '\\' + sht.Name + '.xlsx', 51)
    app.api.ActiveWorkbook.Close()
app.screen_updating = True
In the Python IDLE script window, select Run → Run Module to save the data in each worksheet. The processing effect is shown in the "After Processing" worksheet in Figure 1-28.
Application Example 4: Merging Multiple Worksheets into One
Section 1.6.2 splits a worksheet into multiple worksheets according to the values in a column. This section introduces merging multiple worksheets into one.
The staff information of various departments is shown in the "Before Processing" worksheet in Figure 1-29. The staff information of different departments is placed in separate worksheets. Now, we require merging the data from different worksheets into the "Summary" worksheet and adding a "Department" column, whose value is the name of the source worksheet.
Figure 1-29 Merging Multiple Worksheets into One
We use Excel VBA and Python xlwings to merge each worksheet into the "Summary" worksheet.
【Excel VBA】
The path of the sample file is Samples\ch013\Excel VBA\Application Example 4\Staff of Various Departments.xlsm.
Sub CombineSheets()
    Dim shtT As Worksheet, lngRow As Long, rngT As Range
    Dim lngRT As Long, lngRT2 As Long, lngI As Long
    Worksheets("Summary").Select  		'Select the "Summary" worksheet
    Cells.Clear  					'Clear the "Summary" sheet
    Range("A1").Value = "Department"
    Worksheets(1).Range("A1:D1").Copy Range("B1")  'Copy the header
    For Each shtT In Worksheets  	'Traverse each worksheet except the "Summary" worksheet
        If shtT.Name <> "Summary" Then
            'Copy the data of each department's worksheet to the "Summary" worksheet
            Set rngT = Range("A65536").End(xlUp).Offset(1, 1)
            lngRow = shtT.Range("A1").CurrentRegion.Rows.Count - 1
            shtT.Range("A2").Resize(lngRow, 4).Copy rngT
            'Add the department name in column A of the "Summary" worksheet
            lngRT = Range("A65536").End(xlUp).Row + 1
            lngRT2 = lngRT + lngRow – 1
            'Use the name of the current worksheet as the value of the "Department" column
            For lngI = lngRT To lngRT2
                Cells(lngI, 1).Value = shtT.Name
            Next
        End If
    Next
End Sub
After running the procedure, the processing effect is shown in the "Summary" worksheet after processing in Figure 1-29.
【Python xlwings】
The code implemented using Python xlwings is as follows. The path of the sample data file is Samples\ch13\Python Application\Example 4\Staff of Various Departments.xlsx, and the .py file is saved in the same directory with the name sam1-105.py.
import xlwings as xw  	#Import the xlwings package
#Import Direction from the constants class
from xlwings.constants import Direction
import os  				#Import the os package
root = os.getcwd()  		#Get the directory where the .py file is located, i.e., the current directory
#Create an Excel application, visible, without adding a workbook
app = xw.App(visible=True, add_book=False)
#Open the "Staff of Various Departments.xlsx" file in the current directory, writable, return the workbook object
bk = app.books.open(fullname=root + r'\Staff of Various Departments.xlsx', read_only=False)
sht = bk.api.Worksheets('Summary')  	#Get the "Summary" worksheet
sht.Cells.Clear()  				#Clear the "Summary" worksheet
sht.Cells.Clear()  				#Clear the "Summary" worksheet
sht.Range('A1').Value = 'Department'
bk.api.Worksheets(1).Range('A1:D1').Copy(sht.Range('B1'))  #Copy the header
for shtt in bk.api.Worksheets:   #Traverse each worksheet except the "Summary" worksheet
    if shtt.Name != 'Summary':
        #Copy the data of each department's worksheet to the "Summary" worksheet
        rngt = shtt.Range('A2', shtt.Cells(shtt.\
              Range('A' + str(shtt.Rows.Count)).\
              End(Direction.xlUp).Row, 4))
        row = sht.Range('A1').CurrentRegion.Rows.Count + 1
        rngt.Copy(sht.Cells(row, 2))  #Copy data
        #Add the department name in column A of the "Summary" worksheet
        rt = sht.Range('A' + str(sht.Rows.Count)).\
             End(Direction.xlUp).Row + 1
        row2 = shtt.Range('A1').CurrentRegion.Rows.Count - 1
        row2 = shtt.Range('A1').CurrentRegion.Rows.Count - 1
        rt2 = rt + row2
        #Use the name of the current worksheet as the value of the "Department" column
        for i in range(rt, rt2):
            sht.Cells(i, 1).Value = shtt.Name
In the Python IDLE script window, select Run → Run Module to merge the data from each worksheet into the "Summary" worksheet and add the "Department" column. The processing effect is shown in the "Summary" worksheet after processing in Figure 1-29.